Category Archives: sewing

a newsflash and some makes

i feel i’ve got some explaining to do.  i’ve been neglecting my blog lately.  big style.  but for good reason.

we parked there legitimately.  oh my!  i’m 30 weeks and am still feeling somewhat dumbstruck by the fact that we are having a baby, particularly because i am now, ahem, forty (what?).  much of the last 30 weeks have been spent struggling through incessant nausea (hence, not much baking) and exhaustion (nix on the sewing, crocheting and writing).  despite the knocks, i am still overjoyed to be pregnant – what a trip it is!  fortunately, i’ve been feeling better over the last few months (thank you, diclectin), but my brain just hasn’t cooperated with trying to think creatively, so please forgive me if this post is a painful read.

because my blurry brain thinks it has come up with a baby-themed post, i thought i’d share a couple of baby gifts i’ve made recently.

this is a simple baby snuggler from the free pattern by lotta jansdotter (i think i want to be her – just peek at her website.  wow).  the exterior is chambray, the interior is flannel, and it closes up with velcro, making it a cosy and safe alternative to the now much-feared loose-blanket-in-the-crib.  plus, for those who are swaddle-challenged, it is a tad easier than swaddling a squirmy baby.  it turned out a bit larger than i expected, so i’m not sure it’s newborn-appropriate.  hopefully it will fit the handsome new-babe soon, and will live up to its promises of ensuring sweet-dreams and long sleeps.

next up is an ad-libbed blanket i made up sans-pattern, for another handsome baby-friend of ours.  i was quite pleased with what i came up with, though i do realize one hardly needs a pattern to explain how to construct something as simple as a blanket.  nevertheless, i did whip up some nice bound-edges and added a little appliqued initial to each side to make it a little more personal.  this was my first attempt at applique, so it is less than perfect in its sloppiness, but perhaps it will lend itself to the hand-made vibe of the gift.

a note on fabric – one side of this is a super-soft, fine-wale corduroy, the other a nice checked-flannel.  did you know there is a vast difference in the quality of flannels?  buyer beware!  i bought a great moose-print flannel at fabricland which, sadly, pilled dramatically when washed.  i washed it again, and it looked even worse, with streaks of pilling and it was see-through in places.  unacceptable!  apparently a heavier quilter’s-flannel is the way to go if you’re looking for durability.

IMG_5952

if you’re still reading, thanks for bearing with me and my poor writing and blurry photos.  i do have a few more makes and tasty recipes to share, plus a work-in-progress, so please do stay tuned!

•  •  •

32 Comments

Filed under sewing

zakka {wedding pot holders}

despite my deplorable lack of posts in the last few months, there has been some degree of activity in the sewing room (and the kitchen)…

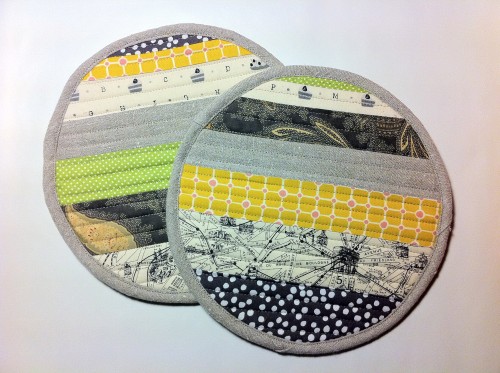
behold: a pair of pot holders i made as a wedding gift for one of my dearest friends.  she and her new husband are both appreciators of fine food, and she loves to cook, so i wrapped these up alongside an heirloom-to-be le creuset braiser.

IMG_5401

i found the inspiration for these in the ‘zakka style’ project book compiled by rashida coleman-hale, and the pattern itself comes courtesy of kim kruzich.  you may recall seeing evidence of the ‘zakka-along’ hosted by LRstitched last year – heaps of adorable and practical linen-based projects from the zakka style book.  the sew-along is a brilliant resource for anyone working on a make from the book.  for the pot holders, you will find an errata and a related tutorial to help you along.  the errata clarified some significant changes to the original instructions, so it’s worth checking it out prior to cutting.  i, however ignorantly, followed the instructions in the book and made out quite alright in the end.  and, as per my usual ‘must-avoid-significant-amounts-of-handstitching-at-all-costs’ mantra, when it came time to finish attaching the bias-binding to the back pockets and the circumference of the pot holders, i took a different approach: i simply pinned well from the top-side and then carefully top-stitched my way around.  while they certainly don’t look as tidy as the specimens in the book, i don’t think the top-stitching looks too shabby in the end, and i do think it will be sturdier than my hand-stitching would have been.

IMG_5404

another note worth making relates to the quilting – the instructions are very simple: “quilt as desired by machine or by hand”.  i liked the look of the straight lines in the book, so i measured out 1/2″ lines from the middle and stitched them consistently across the top of the pot holder, trying to stay parallel to the seams.  not bad for my first attempt at quilting!

IMG_5403

to personalize the gift, i worked in some of my favourite paris-map fabric, which makes these feel a little old-world glamorous to me.  i also used some sweet japanese fabric printed with cakes and letters, which is just so adorable.  both of these fabrics suit the bride’s style perfectly and are much-loved at the workroom, where i purchased them a few years ago.  as a final touch, i embroidered the bride and groom’s initials and wedding date on the back of the pot holders, hoping they will be reminded of their beautiful wedding every time they use them.

IMG_5405

there.  hopefully i’m back on track now, as i have a few other projects and recipes to share with you.  and, as the days are finally getting a little bit longer here, there is hope for some natural light at the end of the day, which should make for some less-drab looking photographs!

i’m curious, what are your thoughts on homemade wedding presents?  have you ever given a handmade wedding gift?

•  •  •

24 Comments

Filed under sewing

purl soho {echino tote}

echino tote

i cart a lot of stuff back and forth between home and work and home again.  lunch, snacks, lint brush (will the dogs ever stop shedding?), books, laptop, shoes, lab coats…so i need a suitably huge bag to accommodate everything.

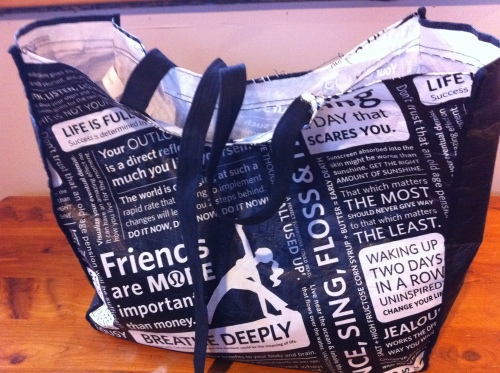
for months now, i’ve been using this lululemon bag which has seen better days.  i can’t really explain why i have continued to use it, except that it was free, and relatively sturdy, and necessarily voluminous.  even after one of the straps ripped out, i continued to cart it back and forth, carrying it like a giant paper bag.  it wasn’t until some of the preachy statements started to irritate me, that i really started thinking about acquiring a new bag.  one with handles.  and no pretentious quotes or semi-subliminal messaging.  enter the apple-picking tote.

why???

i saw this pattern on the purl bee ages ago and thought it was ever so adorable and sturdy looking – perfect for my needs.  i scoured my stash for suitable fabric combinations until i realized i had a lovely piece of lumpy linen and another of an echino print i’ve had for years because i had to have it but was never able to figure out just what it was meant to be.  until now.

molly’s tutorial was great, as usual.  the only change i made to her pattern was to lengthen the handles, as i wanted to be able to carry this over my shoulder as well as in the hand.  i made each handle 6.5″ longer than called for, so the finished length of each is 25.5″ (measuring only the portion that sits above the top edge of the bag – this will make sense when you look at that step in the purl bee tutorial, i promise).  so, if you want a shoulder bag, you’ll want to add 13″ to the required length of bias-tape (which, incidentally, is not cut on the bias for this application).

i now have a practical, sturdy, stashable and fetching tote that makes me happy.  what more could you wish for in a bag?

•  •  •

12 Comments

Filed under sewing

autumn {wiksten tova dress}

since our weather is no longer calling for summer-wear, i’ve set aside my wiksten tank pattern and have finally made my way to the more seasonally versatile wiksten tova.

tova is an easy sew.  it reminds me of some of the gamine dresses one sees in japanese dress books – shapeless and soft with some sweet little finishing details.  tova is made interesting with a front placket set into a gathered panel.  the plackets overlap and are topped off with what i think of as a band-style collar.  or maybe a chairman mao?  either way, it’s a nice touch.  the three-quarter length sleeves are gathered slightly and finished off with a tiny, straightforward, non-restrictive cuff.

like the wiksten tank, you can cut the tova at two different lengths: top or dress.  i made the dress length because i wanted to wear it with leggings and boots this fall and winter.  were i wearing it on its own, sans leg coverage, however, i’d consider making it a tad longer to allow a little more modesty on the gams.  i am fast approaching 40, after all.

i was a good girl and followed the instructions, with the exception of the hand-stitching – i just couldn’t see the point when you end up topstitching the same pieces anyway (this is called for on the collar and the cuffs).  i found that with some careful pinning, i was able to skip the hand-stitching and move right on to the topstitching.  in order to ensure the stitching looked good, i pinned amply from the right side, checked to make sure i would catch the folded edge with my topstitching, then did the topstitching, as you would, on the right side as well.  it worked brilliantly and saved me all of that slow and mostly needless hand-stitching.  hurrah!

a note on the fabric. this print is called ‘eyelet’ and it comes from denyse schmidt‘s ‘flea market fancy’ collection.  it’s pretty sweet, but i’m afraid that the grey of the fabric, along with its subtle white pinstripe and the style of the dress make the whole thing look a little too much like an old-fashioned nightshirt.  i was going to link to a photo of a man yawning in a nightshirt, but it was too disturbing.  here’s hoping i’m the only one who notices this similarity (good thing i pointed it out…).

i didn’t make any changes to the fit – i cut a medium and i find the size accurate and ample.  it’s not the most figure flattering cut, sure, especially in a heavier quilting cotton, but it’s a quick and cosy make and has great multi-season potential.  tova is definitely a keeper.

do you have a favourite basic pattern you keep going back to?  do tell!

•  •  •


34 Comments

Filed under sewing

polka dot {wiksten tank}

i have a thing with polka dots.  and tanks.  and polka-dotted tanks.  i do love dots applied liberally, in dresses and coats and umbrellas, for instance, but i’m not a spotlight-seeker, so i tend to save them for less conspicuous things like linings and wallets.  and, apparently, tanks.  i think i find the cheekiness of polka dots a little less spotlight-grabbing when used in a smaller garment, and a polka-dotted tank suits my sartorially cautious-but-coy side just fine.

i have adored the wiksten patterns for ages, and finally ordered the e-versions of them this summer.  i set about making the tank straight away, printing and taping and cutting the pattern pieces – a slightly tedious task that i rather enjoy.  i also like ironing*.  i’m weird that way.
[*which is ironic, given that this tank is clearly not crease-free.]

i found the pattern quite easy to follow, but i must say that i found the instructions a little sparse in places.  i find it annoying when patterns don’t mention anything about finishing exposed edges.  of course an experienced seamstress knows better than to leave the pocket edges unfinished, but a beginner may not.  it wouldn’t be the worst thing in the world to have a pocket fall off after a few washings, but why suffer that agony if you don’t have to?

i love the shape of this top – it seems so modern.  the curved hem is catchy, and i like that it is slightly longer in the back than it is in the front.  the wee pocket is nice addition, even if it is virtually invisible in my polka dot version.  i do find the neckline almost scandalously low, certainly low enough that i need a layer beneath (or i need to be really careful when bending over).  i did use a cursed quilting cotton for this, albeit a lighter one, so it doesn’t provide the drape i think this pattern demands.  i hope wiksten tank number two, in the glorious V&A voile shown below, will be spot on.  it will, of course, have the added bonus of reminding me of my trips to the V&A, one of my most favourite places in all of london.

i must know, do any of you get sentimental over fabrics?  do you cherish some fabrics so much that you can’t bear to cut into them?  please tell me i’m not the only fabric-nut out there!

•  •  •
25 Comments

Filed under sewing

catching up (in photos)

there has been a lot of undocumented stirring and stitching going on this summer.  here is a small taste of what the last couple of months have looked like…

all of that and a trip to killarney, many a hot run, working five days a week and some lovely chats with lovely people at the studio tour has made this a full and fulfilling summer.  i hope that you have had a marvy summer, too!

•  •  •

9 Comments

Filed under baking, sewing

{bespoke wallet}

i was introduced to these adorable and practical wallets in a post on very berry handmade.  i crossed my fingers as soon as i saw her photos, thinking ‘pleeeeease tell me there is a free pattern for these’, and, hip hip hooray, there was.  (as an aside, i love veryberry’s blog, and i wish i had access to all of the stunning fabrics she sources.  you folks in the uk may want to check out her compendium of uk fabric shops…you’re so lucky!).

the tutorial for these is the work of confessions of a fabricaholic.  it is filled with step-by-step photos and instructions to walk you through your first ever home-made wallet.  thank you, fabricaholic, for sharing your marvy tute!

i’ve made a small collection of these now, and have learned a few lessons along the way.  i’ve used medium-weight cotton for all of these, so i interface the interior and exterior main pieces, as well as the front and back of the zip-pocket, and the largest and smallest card slots.  i interface both the interior and exterior tab pieces, as well.  i’ve learned to cut the interfacing just shy of the seam allowances, as it becomes super bulky if you don’t.  the exception, though, is the tab.  because you trim the seam allowances away and it’s so tiny, i’ve found that full-sized interfacing helps to prevent fraying (i had to remake two tabs because they started to come apart after i turned them).  and back to the card slots – i serged the top edges of the three pieces that remain exposed, just so they don’t fray.

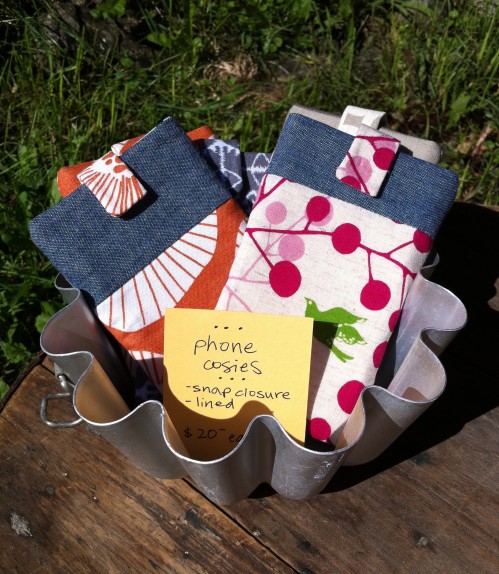
i didn’t like the look of the round, silver snap that i used on my first take (and i found that it didn’t close very securely), so i went with what has become my signature sewn-in snap tab closure, which i’ve used on my phone cosies and computer cosies.  i’d like to try a magnetic closure, but i wasn’t sure about the effect this may have on credit cards inside the wallet.  i’m also playing around with the idea of using buttons with an elastic loop (because who doesn’t love buttons?), but i’ve become pretty loyal to the clean and simple snap tab, and i’m not sure i’m ready to abandon it just yet.

one other  step i tweaked was the zipper insertion.  i worked with a 3/8″ opening instead of 1/2″ – it’s surprising what a difference an eighth of an inch can make, but i do think it makes for a tidier looking zip (certainly tidier than the one shown above).

i’m still working on my edge-stitching.  it’s just not that lovely, is it?  i find the corners particularly difficult to navigate beautifully.  i’ve noticed that very berry’s corners are perfectly curved and very smooth.  how do you do it,  very berry?  what is your secret!?  i know i need to work on symmetry and having my edges perfectly square.  with all of the layers and the turning, this can be difficult to achieve.

since my adorable one-of-a-kind bookhou wallet is on its last legs (i’ve used the heck out of it for five years now), i think it’s time for a bespoke wallet of my own.  now to choose some fabric…

•  •  •

26 Comments

Filed under sewing

{reversible headband}

i’ve been busily sewing lately, trying to churn out goodies for an upcoming studio tour which kicks off in, gasp, 12 more sleeps.  this will be my second year as a guest artist of my friend, the super-talented kim (who not only paints, draws and creates amazing mosaic glass pieces, but is also a first-class baker who has been sharing some of her recipes at crumbsbykim).

one of the lessons i learned last year was: for goodness’ sake, do not leave all of your creating to the last-minute.  last year my procrastination lead to blood, sweat and tears in my sewing room (i am not exaggerating), and too many exclamations of “why, oh whyyyy am i doing this?”.  crisis-driven sewing and crocheting is not fun.

characteristically, despite my hard-learned lesson last year, i find myself once again frantically trying to come up with just the right items to tempt this year’s discerning studio-tourers.  will i never learn?  to add to the struggle, i’ve been working on a few me-designed items which have taken significantly longer to refine than one would think, including some jersey-knit infinity scarves (more on those in another post) and these reversible headbands.

they look simple enough, don’t they?  sure, now that i’ve sorted out the pattern and the process, i can make one rather painlessly, though getting to this point was far from painless.  i spent an entire day doggedly trying to come up with the right shape, drafting and re-drafting, sewing lousy muslin after lousy muslin, muttering curses and vexing myself for pretending i was capable of coming up with something on my own (much the same experience i had with my phone cosies and my tobermory hat).

despite all the head-banging, i’m pretty happy with the results.  overall, this is a comfortable and flattering headband that actually stays put (yes, it’s true!).  being reversible, i think it’s a little more fun than a standard, one-print number, and it’s certainly more versatile.  i really  struggled with the seam that joins the elastic to the ends of the headband, until i came up with a really simple solution which you can see in the close-ups.  the best part?  no hand-stitching!  and no necessary top-stitching, though i may go back and add some for accent.

once the studio tour chaos passes, i plan on writing up a tutorial for the headbands (as well as keeping my long-standing promise to write-up the patterns for the cosies and the hat), though, fair warning, i may procrastinate the tutorialing for just a bit longer so i can do some sewing for myself (i’m desperate to try making a hazel and some summery skirts, though i’m afraid by the time i get to make them, it will be fall).  in the meantime, i’d love to hear from any of you who have experience selling your homemade wares – how do you do it without losing your sanity (or your shirt)?

•  •  •

22 Comments

Filed under sewing

polka dot {sorbetto}

i’ve been ogling others’ sorbettos for months.  fancy, plain, busy, simple, embellished with buttons or sewn simply with its signature pleat, sorbetto is an ace.  there are many reasons to love sorbetto, not least of which is the fact that it’s free (as if the ladies at colette patterns needed another reason for us to love them).  it is a much-loved and oft-sewn little sleeveless blouse, and i’m pleased to say that it has finally made its way into my closet.

one of the endearing qualities of sorbetto is the bias tape.  it’s.  so.  cute.  and polished.  and tailored.  while making bias tape can be a nuisance, there is something satisfying about the whole process that i rather like.  if you don’t like the fiddlyness of sewing all those wee seams, be sure to check out sarai’s tutorial on continuous loop bias tape.  it’s rad!  the concept seemed impossibly difficult at first, but, when i got my head around it, it kind of blew my mind.  turning a 10″x10″ square of fabric into a highway of bias tape just didn’t seem possible…but it worked! with no joining of pieces!  with just 2 seams!  for real!  do try it.  (yes, i see how sloppy my topstitching is.  i think i need a better presser-foot for topstitching.  any suggestions?).

sorbetto taught me another lesson: don’t pretend that quilting weight cotton is appropriate for wee drapey tops.  unfortunately, the slightly boxy shape of this pattern is emphasized by the fabric i used – it is a little too heavy, but i couldn’t get my hands on anything that wasn’t a frankenfabric of syntheticness, so i went with a heavier-weight cotton.  this pattern really needs a lightweight, drapey fabric (it virtually demands tana lawn – i’m powerless, i’ll have to give in!).  also to blame is my shape.  i cut my size according to the measurements, but i could easily cut it a size down next time – i find the back too ample and there’s a little too much room in the bust (sigh).

can’t you just imagine the endless incarnations of sorbetto?   if not, check out the flickr stream or just google ‘sorbetto top’.  so much potential!

•  •  •

15 Comments

Filed under sewing

how to {pincushion ring}

the pincushion ring is such a splendid idea, no?  as soon as i saw instructions for it in a post i was reading, i thought “yes, brilliant, must make one stat”.  that was two months ago, and, while i recall the instructions for the project itself, i cannot, for the life of me, recall the name of the blogger who wrote the tutorial.  what a jerk i am (IDS is tsking me AND waving her pointed finger).  i promise, if i ever manage to shake the memory loose from my dusty brain, i shall give credit where credit is due.

with my mea culpas out of the way, i feel i can, in good stead, get on with the details of this project.  the pincushion ring is one of those ridiculously simple creations that makes a small aspect of life so much easier.  when sewing, i feel like i spend a lot of time reaching back and forth from pincushion to project or from project to pincushion.  this little ring promises to save some of that reaching, keeping my pins (and their perch) so much closer to hand.  and, isn’t it darling?  it looks so sweet that i kind of want to eat it.  and make another batch.

supplies:
button (mine is about 1 1/8″ diameter)
fabric scrap (i cut mine 3 1/2″ diameter)
thin elastic
glue gun
scissors
marking pen
hand-sewing needle
thread

step 1: prepare the ring.  cut a 3″ piece of elastic and thread both ends up through the bottom of your button.  you will be tying them in a knot, but before you do, make sure to try it on so you know how big you want the ring to be (this is tricky to do – i held it in place with my left hand while it was on my left pointer finger and marked the top of each end of elastic so i knew roughly where the knot should end up).  tie a reef knot (remember girl guides?  right over left and through, left over right and through) and check the fit – adjust if needed – and trim off the extra elastic ends.

step 2: prepare the fabric.  cut your fabric in a circle at least 2″ wider in diameter than your ring.  i used a glass to draw the circle.  thread your needle and sew a basic running stitch around the outer edge of the circle, leaving about 1/4″ between your stitches and the outer edge.  cut your thread but leave a good 6″ tail to work with.  get a wad of your batting and ball it up in the middle of your fabric.  holding it in place with a fingertip, gently pull the tail of your thread until you have ensconced the batting with your fabric.  holding tight, stitch from side to side several times to close the hole, then knot your thread and cut.  admire your little dumpling!

step 3: join the two pieces.  heat up your glue gun.  apply a generous amount of hot glue to the knot and all around the top of the button – wherever it will have contact with the fabric cushion.  quickly apply the fabric dumpling (bottom of dumpling to the glue), press firmly and hold until set.  c’est fini!

•  •  •

14 Comments

Filed under sewing