Tag Archives: simple

autumn {wiksten tova dress}

since our weather is no longer calling for summer-wear, i’ve set aside my wiksten tank pattern and have finally made my way to the more seasonally versatile wiksten tova.

tova is an easy sew.  it reminds me of some of the gamine dresses one sees in japanese dress books – shapeless and soft with some sweet little finishing details.  tova is made interesting with a front placket set into a gathered panel.  the plackets overlap and are topped off with what i think of as a band-style collar.  or maybe a chairman mao?  either way, it’s a nice touch.  the three-quarter length sleeves are gathered slightly and finished off with a tiny, straightforward, non-restrictive cuff.

like the wiksten tank, you can cut the tova at two different lengths: top or dress.  i made the dress length because i wanted to wear it with leggings and boots this fall and winter.  were i wearing it on its own, sans leg coverage, however, i’d consider making it a tad longer to allow a little more modesty on the gams.  i am fast approaching 40, after all.

i was a good girl and followed the instructions, with the exception of the hand-stitching – i just couldn’t see the point when you end up topstitching the same pieces anyway (this is called for on the collar and the cuffs).  i found that with some careful pinning, i was able to skip the hand-stitching and move right on to the topstitching.  in order to ensure the stitching looked good, i pinned amply from the right side, checked to make sure i would catch the folded edge with my topstitching, then did the topstitching, as you would, on the right side as well.  it worked brilliantly and saved me all of that slow and mostly needless hand-stitching.  hurrah!

a note on the fabric. this print is called ‘eyelet’ and it comes from denyse schmidt‘s ‘flea market fancy’ collection.  it’s pretty sweet, but i’m afraid that the grey of the fabric, along with its subtle white pinstripe and the style of the dress make the whole thing look a little too much like an old-fashioned nightshirt.  i was going to link to a photo of a man yawning in a nightshirt, but it was too disturbing.  here’s hoping i’m the only one who notices this similarity (good thing i pointed it out…).

i didn’t make any changes to the fit – i cut a medium and i find the size accurate and ample.  it’s not the most figure flattering cut, sure, especially in a heavier quilting cotton, but it’s a quick and cosy make and has great multi-season potential.  tova is definitely a keeper.

do you have a favourite basic pattern you keep going back to?  do tell!

•  •  •


34 Comments

Filed under sewing

{lavender shortbread}

as i’ve said in previous posts, it doesn’t take much to make me don my apron (random cravings are usually considered valid excuses to bake), but this week i do have a legitimate need to bake: it is my duty to contribute 6 dozen delicious cookies for the studio tour this weekend.

last year i baked up a couple of batches of ginger crunch and they were received with oohs and aaahs.  i was planning a repeat performance this year until inspiration struck when i was cutting some lavender from my garden.  i dug out my ‘celebrate lavender festival 2002 cookbook’ and read through the recipes.  there’s a lovely lavender sugar cookie dipped in dark chocolate which i’ve made several times, though i envisioned them all melting together in the heat this weekend and decided i needed something sturdier.  lavender shortbread cookies fit the bill perfectly.

these pale and speckled little bites taste like summer (well, like my imaginary summer in the south of france).  they are mysteriously fragrant – buttery and floral.  they are indeed sturdy, though they taste delicate and soft and not at all like they should be consumed with egg-nog.  they are so easy to eat on their own, one after another, though they beg to be paired with some lavender lemonade on a hot afternoon, or to be taken with tea (proper cup and saucer, and at least one lace doily).

this recipe is as simple as it gets.  the most taxing step is making the lavender sugar, and really, it’s not too taxing at all.  the notes suggest using a food processor or spice mill.  i found my food processor didn’t mince up the lavender buds adequately, so instead i pounded them with my mortar and pestle, which ground up the buds nicely.  the contents did look much like lawn mower clippings, but i went with it and everything turned out beautifully.  as long as the buds are broken up into little threads, you won’t detect their texture in the finished cookies.

my plan for the weekend cookies is to sprinkle them with some lavender sugar prior to baking so they look a little more dressed up (but i’ll sift the lavender out because, though the whole buds do look pretty, they aren’t so nice to chew on).  i hope that they will garner a few oohs and aaahs as well!

•  •  •

lavender shortbread cookies (from ‘the 6th annual celebrate lavender festival 2002 cookbook’, this recipe was contributed by ‘the herbfarm cookbook – 2000’)

1 cup (2 sticks) unsalted butter, chilled, but take out of the fridge 15 minutes before making the dough
4 tbsp fresh lavender buds, or 2 tsp dried lavender buds
1/2 cup sugar
2 cups all-purpose flour

• make lavender sugar: you’re basically grinding the lavender buds with the sugar and there are a few ways you can do this. if using a spice mill or coffee grinder (clean, of course), mix the buds with 1/4 cup of the sugar and grind until fine, then mix in the remaining 1/4 cup of sugar. if using a food processor, mix the buds with all the sugar and blitz until fine. i used my mortar and pestle (see notes in post above) to grind up the lavender buds, then mixed with 1/4 cup sugar and ground some more, then stirred in the remaining 1/4 cup sugar.
• beat the butter (which was on the counter for 15 minutes) with the lavender sugar in your stand mixer on low-speed until the mixture is smooth and there are no detectable lumps of butter when you roll a tsp of the dough between your fingers. DO NOT beat until fluffy. add the flour all at once and mix on low-speed until it forms a cohesive dough.
• turn dough out onto a lightly floured surface (i use a tea towel*) and form it into a smooth rectangular block with no cracks. using a rolling-pin (and more flour, sparingly), roll dough into a 12″ x 9″ rectangle, 1/4″ thick, rotating the dough a quarter turn (gently) each time you roll to ensure it doesn’t stick (i never have this problem when using a floured tea towel). using a straight edge and a paring knife or pastry wheel, cut the dough into 3″ x 1 1/2″ bars, or cut with cookie cutters (i cut into smaller squares and slightly oblong bars). using a spatula, transfer cookies to parchment lined cookie sheets, leaving 1/2″ between the cookies, and refrigerate for at least 30 minutes before baking.
• preheat oven to 300 f. bake cookies until they are coloured lightly like sand, not browned, 22-25 minutes (mine were ready at 18 minutes so start checking early! you don’t want these golden or brown, just pale). lift one to check the underside; it should be just a shade darker on the top. place pan on a rack and cool completely on the pan before moving. stack the cooled cookies in an airtight container and store at room temp for up to a week.  makes 24 cookies (unless you cut them smaller, like i did).  enjoy!

•  •  •

•  •  •
10 Comments

Filed under baking

how to {pincushion ring}

the pincushion ring is such a splendid idea, no?  as soon as i saw instructions for it in a post i was reading, i thought “yes, brilliant, must make one stat”.  that was two months ago, and, while i recall the instructions for the project itself, i cannot, for the life of me, recall the name of the blogger who wrote the tutorial.  what a jerk i am (IDS is tsking me AND waving her pointed finger).  i promise, if i ever manage to shake the memory loose from my dusty brain, i shall give credit where credit is due.

with my mea culpas out of the way, i feel i can, in good stead, get on with the details of this project.  the pincushion ring is one of those ridiculously simple creations that makes a small aspect of life so much easier.  when sewing, i feel like i spend a lot of time reaching back and forth from pincushion to project or from project to pincushion.  this little ring promises to save some of that reaching, keeping my pins (and their perch) so much closer to hand.  and, isn’t it darling?  it looks so sweet that i kind of want to eat it.  and make another batch.

supplies:
button (mine is about 1 1/8″ diameter)
fabric scrap (i cut mine 3 1/2″ diameter)
thin elastic
glue gun
scissors
marking pen
hand-sewing needle
thread

step 1: prepare the ring.  cut a 3″ piece of elastic and thread both ends up through the bottom of your button.  you will be tying them in a knot, but before you do, make sure to try it on so you know how big you want the ring to be (this is tricky to do – i held it in place with my left hand while it was on my left pointer finger and marked the top of each end of elastic so i knew roughly where the knot should end up).  tie a reef knot (remember girl guides?  right over left and through, left over right and through) and check the fit – adjust if needed – and trim off the extra elastic ends.

step 2: prepare the fabric.  cut your fabric in a circle at least 2″ wider in diameter than your ring.  i used a glass to draw the circle.  thread your needle and sew a basic running stitch around the outer edge of the circle, leaving about 1/4″ between your stitches and the outer edge.  cut your thread but leave a good 6″ tail to work with.  get a wad of your batting and ball it up in the middle of your fabric.  holding it in place with a fingertip, gently pull the tail of your thread until you have ensconced the batting with your fabric.  holding tight, stitch from side to side several times to close the hole, then knot your thread and cut.  admire your little dumpling!

step 3: join the two pieces.  heat up your glue gun.  apply a generous amount of hot glue to the knot and all around the top of the button – wherever it will have contact with the fabric cushion.  quickly apply the fabric dumpling (bottom of dumpling to the glue), press firmly and hold until set.  c’est fini!

•  •  •
14 Comments

Filed under sewing

short, dark and handsome {chocolate loaf cake}

not every occasion calls for an iced layer cake (though i could be convinced otherwise without much effort at all).  there are times, of course, when a more modest treat is required – something plain and non-fussy, but equally delicious and satisfying.  when it is one of those times, this is what you should make.

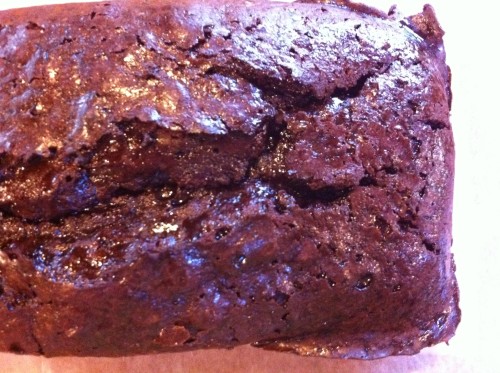
i know, this slab of chocolate loaf may not have the allure of its more glamorous counterparts (really, who can compete with a frosted cupcake?), but rest assured, it more than makes up for its simple looks with its knock-out taste.  its flavour is deep and intense and chocolatey.  its texture manages to be both dense and light at the same time.  it is surprisingly moist and moreishly smooth, and on day three it is still swoon-worthy.  have i convinced you yet?

this recipe comes from one of my intellectual kitchen crushes, nigella lawson.  my copies of her books are dog-eared and spattered with regular use.  i’ve called upon her ‘chocolate cake hall of fame’ chapter (in ‘feast’) so frequently that the book naturally falls open to those pages, and this beauty, on page 272, has become one of my new favourites.  sure, this chocolate loaf cake may not be tall, but it is dark and handsome (and humble and classic and delicious).  what more could you want?

•  •  •

quadruple chocolate loaf cake ( from ‘feast’, by nigella lawson)

for the cake:
200g plain flour
1/2 tsp baking soda
50g cocoa
275g caster sugar (regular granulated sugar works fine here)
175g soft unsalted butter
2 eggs, room temperature
1 tbsp real vanilla extract
80mL sour cream
125mL boiling water
175g dark chocolate chips (or chopped chocolate)

for the syrup:
1 tsp cocoa
125mL water
100g caster sugar (again, i used granulated)
25g dark chocolate (this is shaved for the topping, which i didn’t use)

•preheat oven to 170°c (this is almost 350°f). line a 21cm x 11cm and 7.5cm deep loaf pan with tinfoil and brush/spray with oil (leave some edges of foil sticking out for removing cake from pan).
•put flour, baking soda, sugar, butter, eggs, vanilla and sour cream into food processor and blitz to form a smooth batter (you can also follow the usual routine and make it in a mixer or by hand). scrape down the sides, then pulse again while pouring in the boiling water. stir in the chocolate chips by hand.
•pour batter into prepared pan and bake for about 60 minutes (mine took about 70 min, but my oven is labile), until the loaf is risen, split somewhat down the middle and a cake-tester comes out mostly clean (“…don’t be alarmed at a bit of stickiness in evidence; rather, greet it”).
•not long before the cake is finished baking, put the syrup ingredients into a small saucepan and bring to a boil, then continue to boil (CAREFULLY) for 5-10 minutes, until the liquid is reduced to a slick syrup.
•when the cake is done, place it on a cooling rack and pierce it here and there with a cake tester, then pour the syrup overtop and allow the cake to cool completely (though this is amazing, if a bit delicate, when still slightly warm).
•when ready to serve, remove cake from the pan and shave over some of the dark chocolate (i skipped the shaved chocolate, though it does make the cake look even more glorious).

•  •  •

12 Comments

Filed under baking

sewing kindergarten {schoolhouse tunic}

i find the big world of garment sewing downright intimidating.  you see, as i’ve said previously, when it comes to sewing, i’m great at following instructions, but not so great at ad-libbing.  i really admire folks who can alter a pattern to fit their figure and style, and i seriously envy those who can forego the guidance of patterns altogether and make their own.  respect, mad-sewists!  if a lack of experience is at the root of my sewing inferiority complex, the solution must be to broaden my sewing horizons, no?

i’d had my eye on the schoolhouse tunic pattern for a while (it’s by meg mcelwee, a bona-fide member of the league of mad-sewists.  she’s way too talented).  her tunic pattern is both sweet and modern, with just enough forgiveness in the fit to make it a non-intimidating sew.  i made my first tunic in a baby-soft and surprisingly lightweight corduroy by amy butler.  i absolutely adore the slightly exotic feel of the floral pattern.  it lent itself very well to this simple, comfy project, and i was quite chuffed with the results.  i did find it a little too maternity-wearish initially, what with the double-whammy of front and back reverse box pleats, which look really sweet but aren’t terribly figure flattering, so i sewed down the back pleat which helped to minimize the poufiness of the rump area.

for my second schoolhouse tunic, i went a little more summery and used a slightly graphic, slightly romantic cotton from ty pennington.  yes, that ty pennington.  despite his overly caricatured personality, the dude has good taste in fabric design.  because the sewn-down back pleat in tunic number one was still a little bulky, i decided i needed to delete the back pleat entirely.  though it was the babiest of baby-steps, nixing the pleat did involve a tiny alteration of the pattern (what a brave girl!), and i’m pleased to report that it turned out perfectly.  not only am i much happier with the fit and the silhouette, but i’m quite impressed with my not entirely deliberate fabric matching at the back seam – it’s almost spot on.  silly detail, i know, but it’s progress.  i may not be ready for the league of mad-sewists yet, but i’m happily on my way.

•  •  •

42 Comments

Filed under sewing

{moira’s brownies}

when it comes to baking, i’m suspicious of the ornate.  i’ve always been compelled by apparently simple treats that lure you in with taste over presentation.  thus, my adoration of the old-school brownie.

i’ve been fickle with brownie recipes over the years, moving from moosewood to ina to nigella, temporarily satisfying my quest for brownie perfection.  since i found moira’s brownies, however, i’ve never strayed.  loyalty is easy when you find a recipe this good.

i first tasted moira’s brownies at a holiday fete several years ago, where they were served for dessert, still warm from the oven.  until then, i had been of the icing-free brownie camp, but had to admit that the smooth, dark icing on those brownies made them look terribly enticing.  and the taste?  it was love at first bite.  the top of the brownies was ever so slightly crisp beneath the cocoay icing and the brownie beneath was delectably fudgey and satisfying without being overly sweet.  per.  fec.  tion.  it turned out those beauties had been baked by the hosts’ daughter, moira, who was 9 or 10 at the time.  a negotiation for the recipe soon began.

moira is a clever girl and wise beyond her years.  she has the discerning palate of a well-traveled, open-minded…tween…and knows a good thing when she tastes it.  she had sought out this recipe from friends of theirs and made her first batch when she was just 8.  since she loves to bake, she suggested that her prized brownie recipe could be traded for an equally desirable recipe of mine.  i had brought some holiday baking along, so i suggested she might consider my humble scottish shortbread worthy of the transaction.  she agreed, selected a square and began her assessment.  thankfully, after a well acted dramatic savouring, she smiled and nodded and the deal was done.  phew.

i have since shared moira’s brownies, and her recipe, far and wide.  i’m always careful to explain where the recipe originated, as i think it’s part of the charm of these brownies.  after i tell the story, i also mention that the key to the come-hitherness of these brownies is to ice them while they’re hot.  i know, i know, icing hot brownies flies in the face of collective baking wisdom, but in this case, it’s an exception worth making.  trust me – i know my brownies.

•  •  •

moira’s brownies (though it traveled through many hands before it got to mine, this recipe is said to have originated in the calgary herald, circa the late 1900’s)

1 1/2 cups brown sugar (dark brown is preferable)
1/2 cup melted unsalted butter
2 eggs
1/4 cup cocoa (best quality)
1/2 tsp vanilla (real, of course)
1 cup all-purpose flour
3/4 cup chopped toasted nuts (optional – i still haven’t joined the nuts-in-brownies camp)

•preheat oven to 325°f and grease and line an 8″ or 9″ pan with parchment (i use an 8″ pan).
•mix the brown sugar and melted butter. stir in the eggs one at a time and mix well, then add the vanilla. sift the cocoa in to the mixture, followed by the flour and stir until combined. stir in the nuts, if using.
•spread in prepared pan and bake for 35-40 minutes. prepare the icing as you ice these when they come out of the oven.

1/3 cup unsalted butter, room temperature
1/3 cup cocoa
1 1/2 cups icing sugar
1 1/2 tsp vanilla
2 tbsp milk, more or less

•mix butter and cocoa until you have a smooth paste. stir in the icing sugar and vanilla, beating in the milk a little at a time until you have a nice consistency (remember, this will melt into the brownies, so thick is ok).
•gently spread icing atop the brownies when you take them out of the oven. leave to cool on a rack and try to wait until the icing is set before serving (but they’re quite delicious, if not as clean-cut looking, with molten icing running down the sides…)

•  •  •

•  •  •

12 Comments

Filed under baking

cow pie {chocolate chip cookies}

when i first started baking (decades ago.  decades.  ouch.), i couldn’t make a chocolate chip cookie that didn’t resemble a cow pie.  the cow pie isn’t a very appealing image, i know, but it very aptly described their appearance – wide, flat and bumpy.  looking back, i’m sure this propensity to spread had more to do with my technique than it did with the recipe.  too soft butter (i probably used margarine in those early days – shudder.), too hot an oven,  over beating the dough, using super-dark cookie sheets…all my own missteps.  i had always viewed my cow pie cookies as inferiors to their puffy, golden, cakey cousins, and have been disappointed with just about every single batch i’ve ever made, until last night.

TDHH knows all he has to do is utter the words “i wish we could have some cookies/cake/brownies tonight” and i’ll have my apron tied and ingredients out before he actually finishes his sentence.  i love baking that much.

so last night he requested chocolate chip cookies.   i had already started mentally perusing my recipes, wondering which would yield the least cowpieish cookies, when he clarified that he was hoping for thin, buttery chocolate chip cookies.  a sincere request for cow pies?  really?

i recalled a recipe which met this very description and used fridge-cold butter*, a specification which makes these ideal for a spontaneous treat.  i had scrawled it into my recipe book years ago, and if i recall correctly, it belongs to david lebovitz.  now, i don’t know if his recipe was meant to produce  cow pies, but it does for me, reliably, and i had always considered this a drawback until i came to my cookie senses last night.

these cookies are very thin and golden and studded with dark chocolate chips.  they are buttery and sugary and vanilla-y.  they are at once crispy and chewy.  what in the world is inferior about that?  these cookies are, in a word, sublime – sublime enough to have made me appreciate every bit of their cowpieness and to have been deemed worthy of a spot near the top of my imaginary cookie recipe podium.

*don’t be bothered by this.  it works.  really.

•  •  •

david lebovitz’s (cow pie) {chocolate chip cookies}  (i probably don’t need to restate this, but they’re from david lebovitz)
makes about 2 dozen

1/2 cup granulated sugar
1/2 cup packed light brown sugar
8 tbsp (1/2 cup) cold unsalted butter, cut into 1/2″ pieces
1 large egg
1 tsp pure vanilla extract
1/2 tsp baking soda
1  1/4 cups all-purpose flour
1/4 tsp salt
1  1/2 cups semi-sweet chocolate chips (i used a combination of bittersweet chips, fudge chips and semi-sweet chips)
1 cup walnuts or pecans, toasted and chopped (we weren’t in the mood for nuts)

•preheat oven to 300°f.  beat the sugars and cold butter until smooth (i used my stand mixer – this is one you couldn’t do by hand).  mix in egg and vanilla and baking soda (adding the baking soda like this seemed weird to me).
•stir flour and salt together, then stir into the butter mixture.  stir in the chocolate chips (and nuts, if using).
•scoop batter into 2 tbsp balls and place 4″ apart on cookie sheet (i wonder if they would have spread less if i didn’t use parchment?).  bake for 18 minutes (mine were done in 15).  cool somewhat before handling as they’re fragile when hot.  enjoy!

•  •  •

21 Comments

Filed under baking

baking for breakfast {whole wheat waffles}

my breakfast is predictable: toast, peanut butter, tea.  specifically, whole grain toast, natural peanut butter and a cup of yorkshire gold with milk and a touch of agave syrup.  i like this toast and tea ritual very much, but every now and then i need a change.  cue breakfast baking.

the toast alternatives (waffles, pancakes and french toast) are lovely indeed – carby, doughy goodness anointed with sweet maple syrup.  the trouble is that such a meal always leaves me feeling as if i’ve had dessert for breakfast.  the less indulgent baked breakfast solution is to throw whole wheat flour at the situation.  the rub is that whole wheat baking typically tastes of, well, whole wheat and little else.  not terribly alluring.  cue mark bittman.

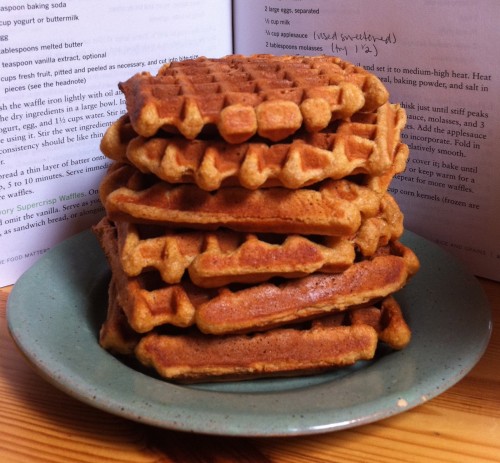
i’ve been a fan of bittman for many years.  my copy of ‘how to cook everything’ is literally falling apart due to overuse.  one of his more recent books, ‘the food matters cookbook’, is full of body (and planet) friendlier recipes that don’t sacrifice flavour in the name of health.  his ‘anadama waffles’ sounded perfect – made with whole wheat flour and cornmeal, sweetened with applesauce and lightly flavoured with molasses, while incorporating beaten egg whites for some airiness and requisite crispiness.  the result, i’d say, was just right.

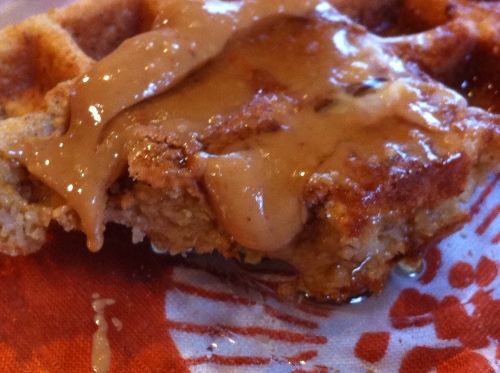
these waffles are, as described by bittman, substantial but fluffy.  they have a subtle sweetness from the applesauce, and the molasses flavour provides just enough tang to counter the toothsome (and typically bland) whole wheat base.  they are simple and lovely with butter and pure maple syrup, and, if any of you are like me and just can’t do breakfast without peanut butter, they stand up nicely to a spoonful of creamy peanutty goodness.  i know – adding pb really makes these virtually identical to my everyday toast repast, but they’re just different enough to make me feel pleased with my effort to climb out of the predictable toast-rut for a day or two (and they give me an excuse to bake first thing in the morning).  cue hearty, satisfying, non-toast breakfast!

•  •  •

whole wheat waffles (from mark bittman, the food matters cookbook)

3 tbsp  vegetable oil
1 1/3 cups whole wheat flour
1/3 cup cornmeal (fine or medium grind – i used fine)
2 tsp baking powder
3/4 tsp salt
2 large eggs, separated
1/2 cup milk
3/4 cup applesause (i used sweetened because that’s what i had on hand)
2 tbsp molasses (i’d cut this back a bit next time)

•prepare your waffle iron and heat the oven to 200°f if you’ll be holding the waffles.
•beat the egg whites just until stiff peaks form. in a separate bowl, beat the yolks, milk, applesauce, molasses and 3 tbsp of vegetable oil until foamy, about 2 minutes. in another bowl, mix the dry ingredients together, then stir them into the applesauce mixture until just combined. fold in the egg whites until the batter is evenly coloured and relatively smooth.
•spread batter thinly in waffle iron and bake until done. serve immediately or keep warm in the pre-heated oven. serves 4-6.

in case you didn’t know, waffles freeze really well and are mighty tasty if reheated carefully in the toaster.  mmm.

•  •  •

25 Comments

Filed under baking

creme fraiche {blueberry scones}

i wish you could smell my house right now.  buttery, floury, sugary, warm – the emanations of scones in the oven.  such a heavenly and comforting scent.  it makes even our mid-renovation kitchen feel glowy and wholesome and good.

instead of being at work today, my cough/cold germs and i are at home, filling the hours with the kind of non-demanding, pleasure-filled tasks that are normally reserved for weekends and evenings (one of the blessings of being sick, i suppose).  my wrists needed a break from crocheting, so my thoughts turned to baking (as they so often do).  i didn’t want anything overly sweet.  or chocolatey.  or involved.  then i remembered i had a tub of creme fraiche in the fridge.

creme fraiche is one of the many culinary treasures i encountered (and immediately loved – along with cream tea, egg and cress sandwiches, bakewell tarts, eccles cakes, greengrocers and ribena) when i lived in the UK.  i’ve been stumbling over recipe after recipe calling for it lately.  sadly, but understandably, it is one of those elusive ingredients that just isn’t stocked in a rural grocery store.  when i discovered it gracing the dairy shelf of the nearest ‘big city grocery store’, i was thrilled…until i got home and couldn’t find even one of those oh so promising sounding recipes.  does this ever happen to you?  it’s a common theme for me.  wonton wrappers, walnut oil, asafoetida, harissa paste and, most recently, creme fraiche – they all held such allure at the time of purchase, until i got them home and couldn’t think of one single thing to do with them.

so this afternoon i decided it was necessary to find a use for this tub of creme fraiche and came across a recipe that wooed me right away – the aforementioned blueberry scones.  i love a good scone and loathe a bad one.  even lashings of butter can’t rescue a dry and flavourless puck of a scone.  despite temptation, i didn’t mix in any lemon zest for zing or adorn their tops with coarse sugar – i just dutifully followed the rather plain sounding recipe, and i’m glad i did.  i think the creme fraiche gives these a deeper and more unique flavour than your standard cream or milk enriched scone.  an IDS approved scone would be thicker and shaped more tidily (i have only myself to blame for the sloppiness), but there is something quaint and pleasing about these simple and flavourful little triangles – they are a perfectly lovely accompaniment to a spoonful of blueberry apple butter and a brit-worthy cuppa on a sniffly afternoon.  enjoy!

•  •  •

blueberry scones (posted by ‘howchow’ on chowhound, 2007)

2 cups  all-purpose flour
1/4 cup  sugar
2 tsp  baking powder
1/2 tsp  salt
blueberries (no measure was given – i used about 3/4 cup frozen wild blueberries – thawed)
6 tbsp  cold butter, cut into pieces
1 egg + 1 egg yolk
7.5 oz  creme fraiche
1 1/2 tsp  vanilla

•stir flour, sugar, baking powder and salt together. blend in butter until it resembles fine meal.  in a separate bowl whisk the egg + yolk, creme fraiche and vanilla together.  gently stir this and the blueberries into the flour mixture (i did the mixing of the butter into the flour and the wet into the dry in my stand mixer, much like when making pie crust).  the dough will be sticky and a little on the wet side.

•bring dough together on a well-floured surface (this is always a clean dish towel for me).  with floured hands, divide dough in half.  pat each half into a disc about 1/2″ thick/6″ in diameter (i would leave them a little thicker next time).  cut each disc into 6 pieces and place pieces 1″ apart on a cookie sheet (i always use parchment).  bake at 350°f for 25 minutes until golden and a toothpick inserted comes out clean (mine only needed 20 minutes).  serve warm or at room temperature.

22 Comments

Filed under baking, crocheting

mighty {stash baskets}

this is the project that marked my return to sewing.

i learned to sew as a youngster (on my sew easy) and carried on with it right through high school.  my twenties, however, saw me neglecting my sewing skills in favour of travel and adventure.  when i finally settled long enough to start nesting again, i bought my first grown-up sewing machine.  despite moving with me from the arctic to the rockies and from the rockies to ontario, my machine didn’t see much regular use until i faced 3 months away from work after knee surgery.  i found myself a copy of sew liberated and became inspired.  i started searching for fabric shops and discovered the likes of amy butler and purl soho online (this would be akin to a trendy bargain-hunter finding h&m).  i planned all kinds of nifty projects to while away my time off, and this was my first.

i chose molly’s sewn stash basket pattern from the purl bee (one of the most amazing craft blogs ever).  these make great multi-purpose storage baskets – perfect for corralling yarn, books, knickers, extra toilet paper…they have so much potential!

the bird basket was take one.  i chose lightweight cotton for both the exterior and interior (that great bird fabric was from ikea), which i learned wasn’t particularly well suited for this use.  even though they were stabilized with a mid-weight interfacing, the fabrics weren’t sturdy enough for the basket to stand up on its own when it was empty.  still, it’s perfect for holding mitts and scarves and shopping bags – all of the bits and bobs that collect near the front door.

i wised up for take two.  i used heavier canvas-weight fabric for the exterior and the lining, et voila – they stand on their own and hold their shape nicely.  i thought that the mama basket needed a baby basket, so i modified the pattern in order to make a smaller version of the  purl soho size.  aren’t they cute together?

actually, when i think back, i made another slight modification – instead of hand stitching much of the bottom and back seams as instructed (sooo tedious and time-consuming, not to mention super difficult to do with 4 to 6 layers of canvas-weight material), i machine-sewed everything and it worked out perfectly (but see the safety caveat below).

these baskets taught me that i need to sew and create.  they led me to discover that there are legions of like-minded crafty folk out there, eager to share their patterns, ideas and experiences.  they also taught me a valuable safety lesson worth noting…whilst powering my machine through said thick layers, my needle broke and the tip flew from the machine, narrowly missing my left eyeball.  yikes!  from thereafter i donned my cycling glasses whenever sewing the thickest sections.  who says sewing is for sissies?

8 Comments

Filed under sewing