

introducing my adorable excuse for months of blog-neglect: our perfectly lovely daughter, aven. we’re quite smitten and seriously sleep deprived, and i’m already day-dreaming about what i can stitch up for our little dumpling (you know, with all that spare time i’ll have…). and, even though it’ll be a few years before she’s whipping up her own sweet treats, i’m looking forward to introducing her to the delicious world of butter and chocolate and dog-eared recipes. lots of good things to come!
my latest work in progress…
Filed under Uncategorized
a newsflash and some makes
i feel i’ve got some explaining to do. i’ve been neglecting my blog lately. big style. but for good reason.

we parked there legitimately. oh my! i’m 30 weeks and am still feeling somewhat dumbstruck by the fact that we are having a baby, particularly because i am now, ahem, forty (what?). much of the last 30 weeks have been spent struggling through incessant nausea (hence, not much baking) and exhaustion (nix on the sewing, crocheting and writing). despite the knocks, i am still overjoyed to be pregnant – what a trip it is! fortunately, i’ve been feeling better over the last few months (thank you, diclectin), but my brain just hasn’t cooperated with trying to think creatively, so please forgive me if this post is a painful read.
because my blurry brain thinks it has come up with a baby-themed post, i thought i’d share a couple of baby gifts i’ve made recently.

this is a simple baby snuggler from the free pattern by lotta jansdotter (i think i want to be her – just peek at her website. wow). the exterior is chambray, the interior is flannel, and it closes up with velcro, making it a cosy and safe alternative to the now much-feared loose-blanket-in-the-crib. plus, for those who are swaddle-challenged, it is a tad easier than swaddling a squirmy baby. it turned out a bit larger than i expected, so i’m not sure it’s newborn-appropriate. hopefully it will fit the handsome new-babe soon, and will live up to its promises of ensuring sweet-dreams and long sleeps.

next up is an ad-libbed blanket i made up sans-pattern, for another handsome baby-friend of ours. i was quite pleased with what i came up with, though i do realize one hardly needs a pattern to explain how to construct something as simple as a blanket. nevertheless, i did whip up some nice bound-edges and added a little appliqued initial to each side to make it a little more personal. this was my first attempt at applique, so it is less than perfect in its sloppiness, but perhaps it will lend itself to the hand-made vibe of the gift.

a note on fabric – one side of this is a super-soft, fine-wale corduroy, the other a nice checked-flannel. did you know there is a vast difference in the quality of flannels? buyer beware! i bought a great moose-print flannel at fabricland which, sadly, pilled dramatically when washed. i washed it again, and it looked even worse, with streaks of pilling and it was see-through in places. unacceptable! apparently a heavier quilter’s-flannel is the way to go if you’re looking for durability.


if you’re still reading, thanks for bearing with me and my poor writing and blurry photos. i do have a few more makes and tasty recipes to share, plus a work-in-progress, so please do stay tuned!
• • •
Filed under sewing
zakka {wedding pot holders}
despite my deplorable lack of posts in the last few months, there has been some degree of activity in the sewing room (and the kitchen)…
behold: a pair of pot holders i made as a wedding gift for one of my dearest friends. she and her new husband are both appreciators of fine food, and she loves to cook, so i wrapped these up alongside an heirloom-to-be le creuset braiser.

i found the inspiration for these in the ‘zakka style’ project book compiled by rashida coleman-hale, and the pattern itself comes courtesy of kim kruzich. you may recall seeing evidence of the ‘zakka-along’ hosted by LRstitched last year – heaps of adorable and practical linen-based projects from the zakka style book. the sew-along is a brilliant resource for anyone working on a make from the book. for the pot holders, you will find an errata and a related tutorial to help you along. the errata clarified some significant changes to the original instructions, so it’s worth checking it out prior to cutting. i, however ignorantly, followed the instructions in the book and made out quite alright in the end. and, as per my usual ‘must-avoid-significant-amounts-of-handstitching-at-all-costs’ mantra, when it came time to finish attaching the bias-binding to the back pockets and the circumference of the pot holders, i took a different approach: i simply pinned well from the top-side and then carefully top-stitched my way around. while they certainly don’t look as tidy as the specimens in the book, i don’t think the top-stitching looks too shabby in the end, and i do think it will be sturdier than my hand-stitching would have been.

another note worth making relates to the quilting – the instructions are very simple: “quilt as desired by machine or by hand”. i liked the look of the straight lines in the book, so i measured out 1/2″ lines from the middle and stitched them consistently across the top of the pot holder, trying to stay parallel to the seams. not bad for my first attempt at quilting!

to personalize the gift, i worked in some of my favourite paris-map fabric, which makes these feel a little old-world glamorous to me. i also used some sweet japanese fabric printed with cakes and letters, which is just so adorable. both of these fabrics suit the bride’s style perfectly and are much-loved at the workroom, where i purchased them a few years ago. as a final touch, i embroidered the bride and groom’s initials and wedding date on the back of the pot holders, hoping they will be reminded of their beautiful wedding every time they use them.

there. hopefully i’m back on track now, as i have a few other projects and recipes to share with you. and, as the days are finally getting a little bit longer here, there is hope for some natural light at the end of the day, which should make for some less-drab looking photographs!
i’m curious, what are your thoughts on homemade wedding presents? have you ever given a handmade wedding gift?
• • •
Filed under sewing
purl soho {echino tote}

i cart a lot of stuff back and forth between home and work and home again. lunch, snacks, lint brush (will the dogs ever stop shedding?), books, laptop, shoes, lab coats…so i need a suitably huge bag to accommodate everything.
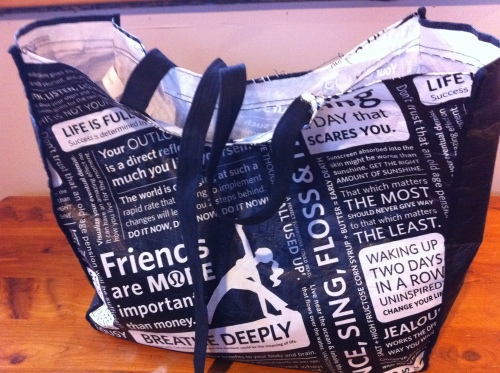
for months now, i’ve been using this lululemon bag which has seen better days. i can’t really explain why i have continued to use it, except that it was free, and relatively sturdy, and necessarily voluminous. even after one of the straps ripped out, i continued to cart it back and forth, carrying it like a giant paper bag. it wasn’t until some of the preachy statements started to irritate me, that i really started thinking about acquiring a new bag. one with handles. and no pretentious quotes or semi-subliminal messaging. enter the apple-picking tote.
i saw this pattern on the purl bee ages ago and thought it was ever so adorable and sturdy looking – perfect for my needs. i scoured my stash for suitable fabric combinations until i realized i had a lovely piece of lumpy linen and another of an echino print i’ve had for years because i had to have it but was never able to figure out just what it was meant to be. until now.

molly’s tutorial was great, as usual. the only change i made to her pattern was to lengthen the handles, as i wanted to be able to carry this over my shoulder as well as in the hand. i made each handle 6.5″ longer than called for, so the finished length of each is 25.5″ (measuring only the portion that sits above the top edge of the bag – this will make sense when you look at that step in the purl bee tutorial, i promise). so, if you want a shoulder bag, you’ll want to add 13″ to the required length of bias-tape (which, incidentally, is not cut on the bias for this application).
i now have a practical, sturdy, stashable and fetching tote that makes me happy. what more could you wish for in a bag?
• • •
Filed under sewing
loot!
this giveaway is too good not to share. actually, it’s too good to share, but i’ll share it anyway.
most of you probably already have a crush on megan nielsen and her patterns. if you haven’t stumbled upon her yet, you really should check out her blog – it’s loaded with some amazing tutorials (particularly fabulous for anyone needing maternity ideas). AND, if you drop by her blog today, you’ll find out about all of the loot she is planning on giving away to celebrate the one year anniversary of her business (and her very own birthday as well). what a generous way to mark the occasion and spread the word about her wonderful company!
fingers crossed!
Filed under Uncategorized
autumn {wiksten tova dress}
since our weather is no longer calling for summer-wear, i’ve set aside my wiksten tank pattern and have finally made my way to the more seasonally versatile wiksten tova.

tova is an easy sew. it reminds me of some of the gamine dresses one sees in japanese dress books – shapeless and soft with some sweet little finishing details. tova is made interesting with a front placket set into a gathered panel. the plackets overlap and are topped off with what i think of as a band-style collar. or maybe a chairman mao? either way, it’s a nice touch. the three-quarter length sleeves are gathered slightly and finished off with a tiny, straightforward, non-restrictive cuff.

like the wiksten tank, you can cut the tova at two different lengths: top or dress. i made the dress length because i wanted to wear it with leggings and boots this fall and winter. were i wearing it on its own, sans leg coverage, however, i’d consider making it a tad longer to allow a little more modesty on the gams. i am fast approaching 40, after all.

i was a good girl and followed the instructions, with the exception of the hand-stitching – i just couldn’t see the point when you end up topstitching the same pieces anyway (this is called for on the collar and the cuffs). i found that with some careful pinning, i was able to skip the hand-stitching and move right on to the topstitching. in order to ensure the stitching looked good, i pinned amply from the right side, checked to make sure i would catch the folded edge with my topstitching, then did the topstitching, as you would, on the right side as well. it worked brilliantly and saved me all of that slow and mostly needless hand-stitching. hurrah!

a note on the fabric. this print is called ‘eyelet’ and it comes from denyse schmidt‘s ‘flea market fancy’ collection. it’s pretty sweet, but i’m afraid that the grey of the fabric, along with its subtle white pinstripe and the style of the dress make the whole thing look a little too much like an old-fashioned nightshirt. i was going to link to a photo of a man yawning in a nightshirt, but it was too disturbing. here’s hoping i’m the only one who notices this similarity (good thing i pointed it out…).
i didn’t make any changes to the fit – i cut a medium and i find the size accurate and ample. it’s not the most figure flattering cut, sure, especially in a heavier quilting cotton, but it’s a quick and cosy make and has great multi-season potential. tova is definitely a keeper.
do you have a favourite basic pattern you keep going back to? do tell!
• • •
Filed under sewing
cardamom {carrot cake}

carrot cake is far from exciting, i know. there are recipes for it everywhere, and they’re all much the same: take a mildly spiced cake, mix in some shredded carrots for moisture and sweetness, and top it all off with lashings of cream cheese icing. it’s a classic, so there really isn’t any need to reinvent it, is there?
the recipe i tend to use for carrot cake comes from the rebar cookbook (i’ve shared another one of their recipes here). rebar’s ‘coconut carrot cake’ is most excellent as is, though it does stray somewhat from your typical carrot cake recipe by including crushed pineapple and coconut in the cake, and white chocolate in the icing. sometimes, however, one needs a bit of a change from routine. well, that, and i didn’t have any pineapple, and i didn’t want the super-sweet white chocolate icing. so, i improvised. i subbed in an extra dose of carrots to replace the pineapple, and mixed in some cardamom for a bit of a twist. and. it. worked. the cake is just as moist and light as the original, but with a subtle warmth and exotic spice from the cardamom, which makes it feel as if it hails more from the middle east rather than the tropics.

i decided to extend the semi-exotic flavours to the icing by mixing in some fresh orange juice and orange flower water (finally, a use for the little bottle that has been languishing in my pantry for years!). i also cut the icing sugar by almost two-thirds, so i could taste the tang of the cream cheese and the orange without being smothered with sugary sweetness. this made for a much lighter frosting, which i think i like even better than the original.
sometimes a little forced variation is a good thing.

what do you think about altering classic recipes? is it best to leave tried-and-true recipes alone? does it seem pretentious to substitute new flavours and techniques?
• • •
cardamom carrot cake (adapted from ‘rebar, modern food cookbook’ by audrey alsterberg and wanda urbanowicz)
cake
2 1/2 cups grated carrots (peeled first, of course)
1/2 cup dried cranberries or raisins (i’m not sure if i like this addition or not, though sultanas would work well with the theme – they’re totally optional)
3/4 cup unsweetened coconut (i did include this but would consider it optional as well)
3/4 cup vegetable oil
3/4 cup brown sugar
1/3 cup white sugar
3 large eggs
2 tsp vanilla
1 1/2 cups unbleached flour
2 tsp baking powder
1/4 tsp salt
1 1/2 tsp ground cinnamon
1 1/2 tsp ground ginger
1/2 – 1 tsp ground cardamom (or freshly grated)
1/2 tsp ground nutmeg (or freshly grated)
icing
9 oz package philadelphia cream cheese (yep, i do think this is one application where phily is waaay superior – the no-name stuff tastes chalky)
1/4 cup unsalted butter, softened
1 tsp vanilla
1/2 tsp orange flower water (to taste)
1 tbsp fresh orange juice (to taste)
1/2 – 1 cup icing sugar, sifted
pre-heat oven to 350°. butter and flour (or line) two 8″ sandwich tins.
•combine grated carrot with any of the additions you’re using and set aside. in your mixing bowl, beat the sugars with the eggs, then stir in the vanilla and whip on high-speed until the volume has tripled. on low-speed, pour in the oil slowly to blend in.
•combine the remaining dry ingredients and gently stir into the batter. fold in the carrot mixture. divide batter evenly between the two pans and smooth the tops. bake 30-35 minutes, until a tester comes out clean. cool in pans on a cooling rack for 10 minutes, then invert pans to release the cakes and cool completely.
•to make the icing, beat the cream cheese on high until smooth and fluffy. beat in the vanilla and butter along with the orange flower water and orange juice. blend in 1/2 cup icing sugar, adding more if needed for the consistency you desire. adjust the orange flavourings if needed, and beat the icing until it is thoroughly combined.
•when cakes are cool, place one cake on serving plate and spread with no more than half of the icing. top with the second cake and frost with remaining icing. i find this cake keeps well, at room temperature or in the fridge, for days.
• • •
Filed under baking
polka dot {wiksten tank}

i have a thing with polka dots. and tanks. and polka-dotted tanks. i do love dots applied liberally, in dresses and coats and umbrellas, for instance, but i’m not a spotlight-seeker, so i tend to save them for less conspicuous things like linings and wallets. and, apparently, tanks. i think i find the cheekiness of polka dots a little less spotlight-grabbing when used in a smaller garment, and a polka-dotted tank suits my sartorially cautious-but-coy side just fine.

i have adored the wiksten patterns for ages, and finally ordered the e-versions of them this summer. i set about making the tank straight away, printing and taping and cutting the pattern pieces – a slightly tedious task that i rather enjoy. i also like ironing*. i’m weird that way.
[*which is ironic, given that this tank is clearly not crease-free.]

i found the pattern quite easy to follow, but i must say that i found the instructions a little sparse in places. i find it annoying when patterns don’t mention anything about finishing exposed edges. of course an experienced seamstress knows better than to leave the pocket edges unfinished, but a beginner may not. it wouldn’t be the worst thing in the world to have a pocket fall off after a few washings, but why suffer that agony if you don’t have to?

i love the shape of this top – it seems so modern. the curved hem is catchy, and i like that it is slightly longer in the back than it is in the front. the wee pocket is nice addition, even if it is virtually invisible in my polka dot version. i do find the neckline almost scandalously low, certainly low enough that i need a layer beneath (or i need to be really careful when bending over). i did use a cursed quilting cotton for this, albeit a lighter one, so it doesn’t provide the drape i think this pattern demands. i hope wiksten tank number two, in the glorious V&A voile shown below, will be spot on. it will, of course, have the added bonus of reminding me of my trips to the V&A, one of my most favourite places in all of london.

i must know, do any of you get sentimental over fabrics? do you cherish some fabrics so much that you can’t bear to cut into them? please tell me i’m not the only fabric-nut out there!
• • •
Filed under sewing
catching up (in photos)
there has been a lot of undocumented stirring and stitching going on this summer. here is a small taste of what the last couple of months have looked like…


all of that and a trip to killarney, many a hot run, working five days a week and some lovely chats with lovely people at the studio tour has made this a full and fulfilling summer. i hope that you have had a marvy summer, too!
• • •
{peanut butter crack bars}

i’m sorry to do this to you. really, i am. because i am fair and kind, i will warn you: these bars are highly addictive – exercise caution in their presence.
these peanut butter crack bars owe their high addiction factor to two variables: they are childs’ play to make and they’re terribly easy to eat. their moreishly smooth and creamy peanut butter base is topped with a thin lid of chocolate melted with peanut butter – a highway to the danger zone, if there ever was one. i dare you not to consume spoonfuls of the base before it makes its way to the pan.

i found this recipe on la creativite de la fille and have tweaked it ever so slightly, so i am sharing my version of her lovely recipe below.
the main tweak i made was to use natural peanut butter instead of regular, processed peanut butter. i’m always cautious when doing this, though, as there are instances where it just doesn’t work. in this case, however, i’m happy to report that it worked out brilliantly (probably due in part to the fact that they’re not baked). to compensate for the natural peanut butter and the unsalted butter substitutions, i’ve added a little bit of needed salt. i also upped the quantity of peanut butter, which makes my version more peanutty-sweet than knock-your-teeth-out sweet.
and, for those of you who don’t trust yourselves in the presence of this confection, i can tell you that a half-recipe fits quite nicely into a standard loaf pan, which makes these bars far less dangerous.

• • •
peanut butter crack bars (adapted slightly from ‘creativite de la fille’, who credits ‘let’s dish’)
for the base:
1 cup unsalted butter, melted
2 cups graham cracker crumbs (i blitzed more or less 1 sleeve of graham crackers in my food processor)
2 cups icing sugar
1 1/4 cups natural peanut butter
1/4 tsp of salt
for the topping:
4 tbsp natural peanut butter
1 1/2 cups semi-sweet chocolate chips
•in a large bowl, mix all of the base ingredients together until well blended. tip into an ungreased 9″x13″ pan and pat down evenly.
•melt the topping ingredients together (i do this in the microwave on 50% power for 60 seconds, stopping to stir, then in 30 second intervals, stirring each time, until it is melted. you can also do this in a pyrex bowl over a pan of simmering water, stirring frequently). pour overtop the base and spread evenly.
•refrigerate a minimum of 1 hour before cutting into squares.
•if you live in a hot/humid climate, or if you’re storing them for more than a day, you’ll want to keep these in the fridge. either way, you’ll want them in an airtight container.
• • •
Filed under baking


